The Automated, No-Code Data Stack
Learn how Astera Data Stack can simplify and streamline your enterprise’s data management.

How To Build an API to Visualize Data in PowerBI: Step-by-Step Process
In his API mandate, Jeff Bezos made it compulsory for every team at Amazon to expose its functionality and data through APIs and restricted communication through these interfaces. The mandate, issued in 2002, became the foundation of Amazon’s success.
Amazon proves what APIs (application programming interfaces) can do for a business. They break down enterprise barriers and make room for rapid innovation, allowing you to offer new products and services faster and at a lower cost. Making your enterprise a composable, modular entity allows you to explore new revenue opportunities and partner with third-party providers, just like every app now uses Google Maps.
To harness the powers of APIs and visualize data in PowerBI, you must first understand the fundamentals of building an API and how to start your API journey with a code-free tool immediately.
Purpose of an API
An API defines the methods and data formats used for communication between software components. It acts as an intermediary between different systems, allowing them to interact in a standardized and efficient manner. APIs abstract the complexities of underlying systems, and expose only the necessary functionalities and data for developers to work with.
Think of an API as a waiter in a restaurant. The waiter takes your order, communicates it to the kitchen, and brings you the food when it’s ready. In this analogy, the API is the waiter, the kitchen is the system providing the functionality, and you are the developer or user making the request.
Different Types of APIs
APIs are categorized into different types based on their functionality and purpose. Some common types of APIs include:
- Web APIs: Also known as HTTP APIs, web APIs enable communication between two different systems over the internet using standard web protocols such as HTTP. They allow developers to access and manipulate web resources, such as retrieving data from a database or submitting a form on a website.
- RESTful APIs: Representational State Transfer (REST) APIs are a subset of web APIs that adhere to a set of architectural constraints. They leverage the HTTP protocol to perform CRUD operations (Create, Read, Update, Delete) on resources. RESTful APIs are widely used due to their simplicity, scalability, and compatibility with various programming languages and platforms.
- SOAP APIs: Simple Object Access Protocol (SOAP) APIs are based on the XML messaging protocol and are known for their robustness and security. They provide a standardized way of exchanging structured information between systems. SOAP APIs are commonly used in enterprise applications where reliability and transactional support are critical.
- GraphQL APIs: GraphQL APIs are query-based APIs that allow clients to request only the specific data they need. They provide flexibility and efficiency by reducing over-fetching and under-fetching of data. With GraphQL, clients can define the shape and structure of the response they expect, resulting in optimized data retrieval and reduced network overhead.
Preparing for Building an API
Before diving into the actual development process, it is crucial to prepare adequately. Careful planning and consideration will ensure that your API is well-designed, efficient, and meets the needs of your users.
This section will guide you through the essential steps you need to take to set the groundwork for your API development journey.
Defining the Objective of Your API
Every successful API starts with a clear and well-defined goal. Before writing a single line of code, take the time to articulate the goals and objectives of your API. Ask yourself what problem you are trying to solve or what value you want to deliver to your users.
Defining the purpose of your API will help you prioritize features and design decisions. It will also guide you in creating an API that aligns with your overall business strategy.
For example, suppose you are developing an API for an e-commerce platform. In that case, your purpose might be to provide a seamless integration for third-party developers to access product information, manage orders, and process payments.
Planning Your API’s Functionality
Once you have a clear purpose in mind, it’s time to plan the functionality of your API. Consider the specific features and capabilities your API needs to provide to fulfill its purpose.
Break down your API’s functionality into smaller, manageable components. This will allow you to develop and test each component individually and make the overall development process more efficient and less error prone.
For instance, if your API is focused on providing weather data, you may need to plan for endpoints that allow users to retrieve current weather conditions, forecast data, and historical weather information. You can develop each of these functionalities separately and then integrate into the overall API.
Step-by-Step Guide to Building Your API
Once you have laid the groundwork for your API, it’s time to dive into the design phase. Designing your API involves making architectural decisions, defining endpoints, structuring data, and implementing authentication mechanisms.
Establishing API Endpoints
The endpoints of your API define the available resources and the operations that can be performed on them. When establishing API endpoints, it’s crucial to consider the principles that best align with your API’s functionality and your users’ expectations.
While REST is a widely adopted architectural style for building web services, it’s not the only approach. RESTful principles provide a set of constraints for creating standardized APIs that are easy to understand and use. Still, other types of APIs with different design principles may be more suitable for your specific use case.
Utilize HTTP methods such as GET, POST, PUT, and DELETE to perform actions on resources. Each HTTP method has a specific purpose, and by using them correctly, you can create a clear and intuitive API. For example, use GET to retrieve data, POST to create new resources, PUT to update existing resources, and DELETE to remove resources. However, the choice of API design style should be based on your project’s unique requirements and the nature of your application.
Structuring Your API’s Data
The structure of your API’s data is crucial to its usability and maintainability. Design a logical and intuitive data model that reflects the entities and relationships within your API.
When structuring your API’s data, consider data normalization and denormalization factors. Data normalization is used to eliminate redundancy and improve efficiency by organizing data into tables. On the other hand, denormalization improves performance by combining related data into a single table.
Another fundamental consideration in API design is choosing the right data type such as strings, numbers, booleans, dates, and arrays. The right data type plays a vital role in ensuring data integrity, validating inputs, enhancing compatibility, optimizing performance, simplifying documentation, and enabling effective error handling. With the right data types, you can create reliable, efficient, and user-friendly interfaces that are both developer-friendly and future-proof.
Implementing API Authentication
Security is a critical aspect in API design, which is why you need to implement API authentication to control access to your API and protect sensitive user data.
Consider using industry-standard authentication protocols such as OAuth 2.0 or JSON Web Tokens (JWT) to secure your API. These protocols provide a secure and standardized way to authenticate and authorize requests. OAuth 2.0 allows you to grant limited access to their resources without sharing their credentials, while JWT provides a compact and self-contained way to transmit authentication information.
When implementing API authentication, authenticate requests based on tokens or credentials provided by the client. This ensures that only authorized users can access protected resources. Additionally, enforce authorization rules to restrict access to certain resources or functionalities based on the user’s role or permissions.
Testing Your API’s Functionality
Thoroughly testing your API is crucial to ensure its functionality and reliability. Create comprehensive test suites that cover various use cases and edge cases.
Automating your tests using testing frameworks and tools relevant to your programming language can save you time and effort. These tools provide a systematic way to execute test cases and verify the expected behavior of your API. By testing both the normal and exceptional scenarios, you can ensure that your API handles different situations correctly.
Additionally, consider implementing unit tests, integration tests, and performance tests to assess the robustness and efficiency of your API. These tests can help you identify bottlenecks, uncover hidden bugs, and optimize the overall performance of your API.
Build APIs the Code-Free Way with Astera API Management
According to the Postman Survey, over 40% of API developers devote more than 20 hours a week in designing, developing, validating, and debugging before getting them live to production. You can make this process easier by using a code-free tool to automate most tasks.
Astera API Management is a code-free solution that makes designing, configuring, testing, deploying, and managing APIs easier. Let’s see how you can use Astera to accelerate your API lifecycle.
1. Develop and Validate API Flows
Astera simplifies the process by allowing you to connect objects in a drag-and-drag, visual interface where design patterns are validated and approved. With the ease of inheriting functionalities, you can easily filter, sort, or consume API responses as a paginated series, all with a point-and-click model.
An API flow starts with a request and ends with a response. An API request allows you to define the input parameters and payload requirements that you expect from the API consumer. This input is then used to run the API flow and provide the consumer with a response.

Input Parameters and API Configuration in Astera API Management
Once you’ve set up the request, you can integrate various data connectors or manipulate the data using Astera’s library of built-in transformations.
Astera APIs are defined based on REST standards. Each API flow must operate on a defined resource. All defined requests and responses are used to generate a fully documented Open API specification.
While designing APIs, you can preview to see the data flow at every step to ensure that they are working properly on the given test values.
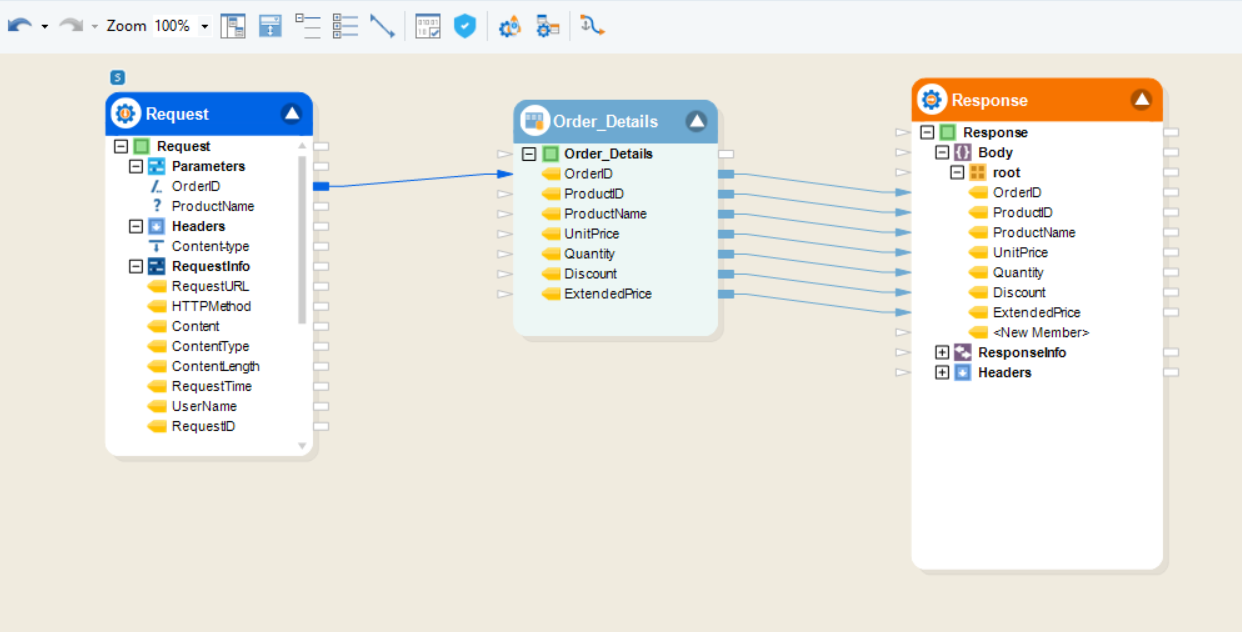
API Flow in Astera API Management
2. Deploy and Test API Flows
Once designed, you can immediately deploy APIs for testing. Deployments can be customized and/or grouped to include multiple API flows. Astera automatically verifies all flows prior to deployment, so you can fix any issues.
During production, an API administrator manages access at every stage, including activation, versioning, and monitoring. Every confirmed deployment appears in the Server Browser, allowing you to view, monitor, and secure all deployed APIs in a consolidated tree view.
Astera also automatically generates Swagger API Documentation as Open API specification to facilitate API consumption.
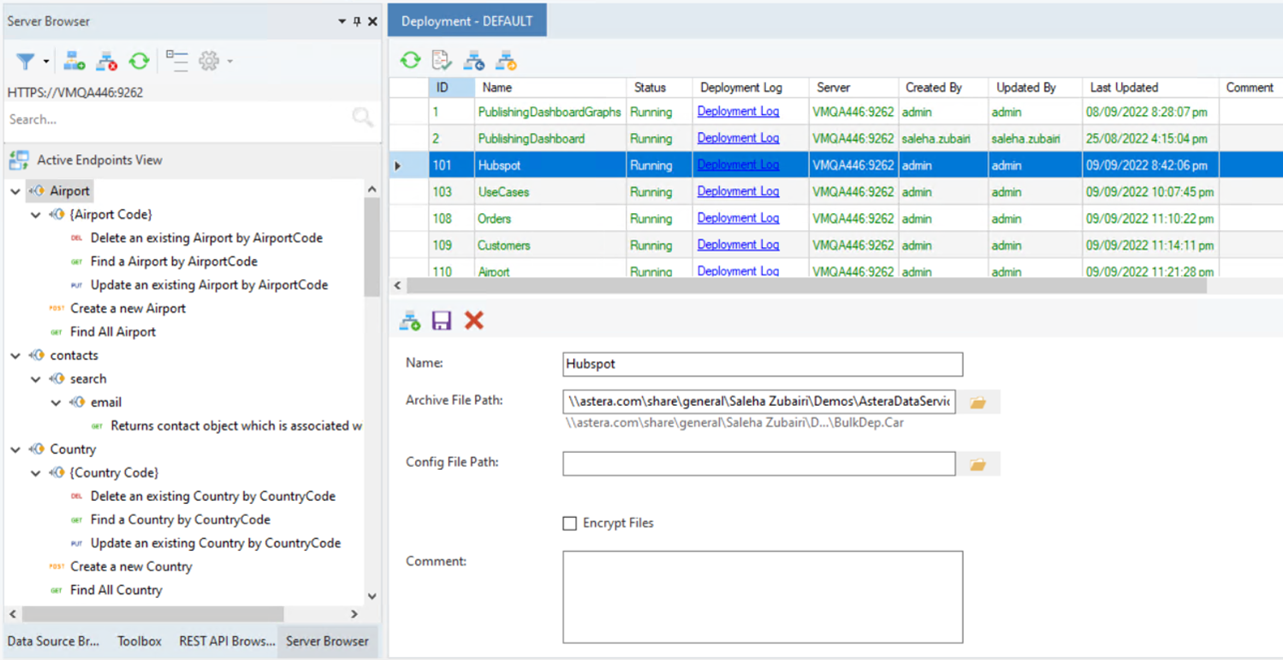
Server Browser
3. Manage and Secure Access
Admins can implement access control through the API administrator in Astera API Management solution, allowing users to view and manage only the specific resources in line with their work domains. Furthermore, you can also customize consumer roles and permissions.
Once a role is created, you can assign it to multiple registered users, creating a flexible management system. Users receive a Bearer token, allowing them to interact with and manage the published APIs in their access.
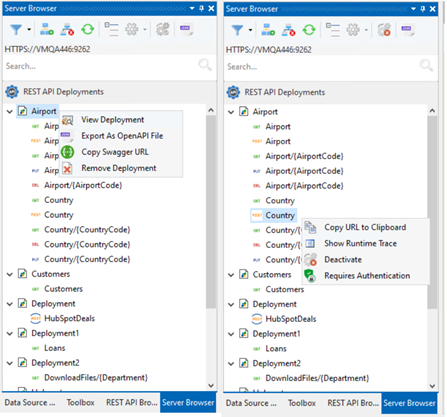
API Security
4. Monitor and Debug
When APIs are running, admins need to have access to granular logs for analysis and debugging. The log window provides such access, allowing admins to view API runtime calls with logs and traces for every individual endpoint. Each request can also be tracked with a unique ID.
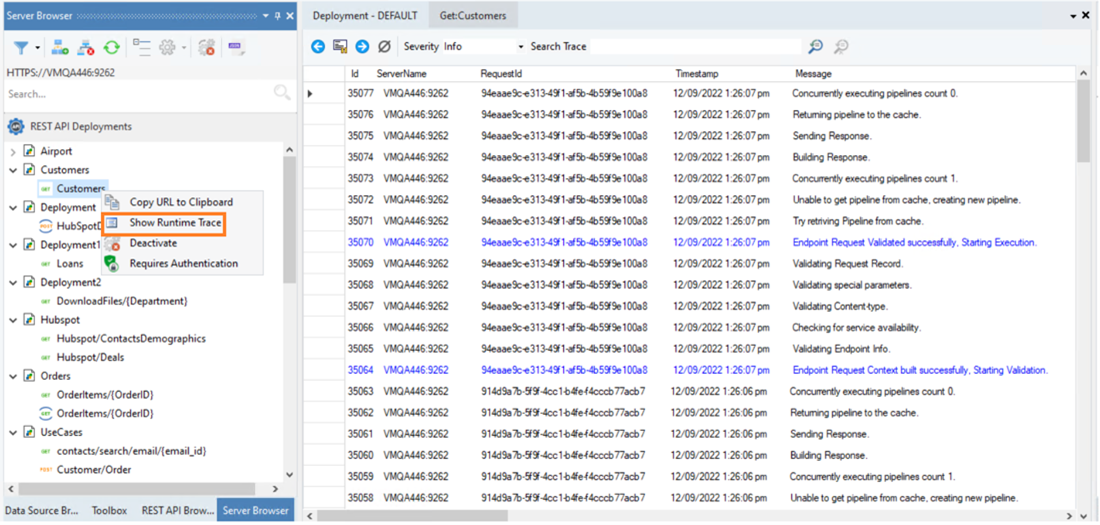
Log Window
Additionally, all API request logs are aggregated to display crucial performance metrics via a monitoring dashboard. The dashboard provides a bird’s eye view of your data, including current API traffic, requests by response status, and overall statistics on request and response time.
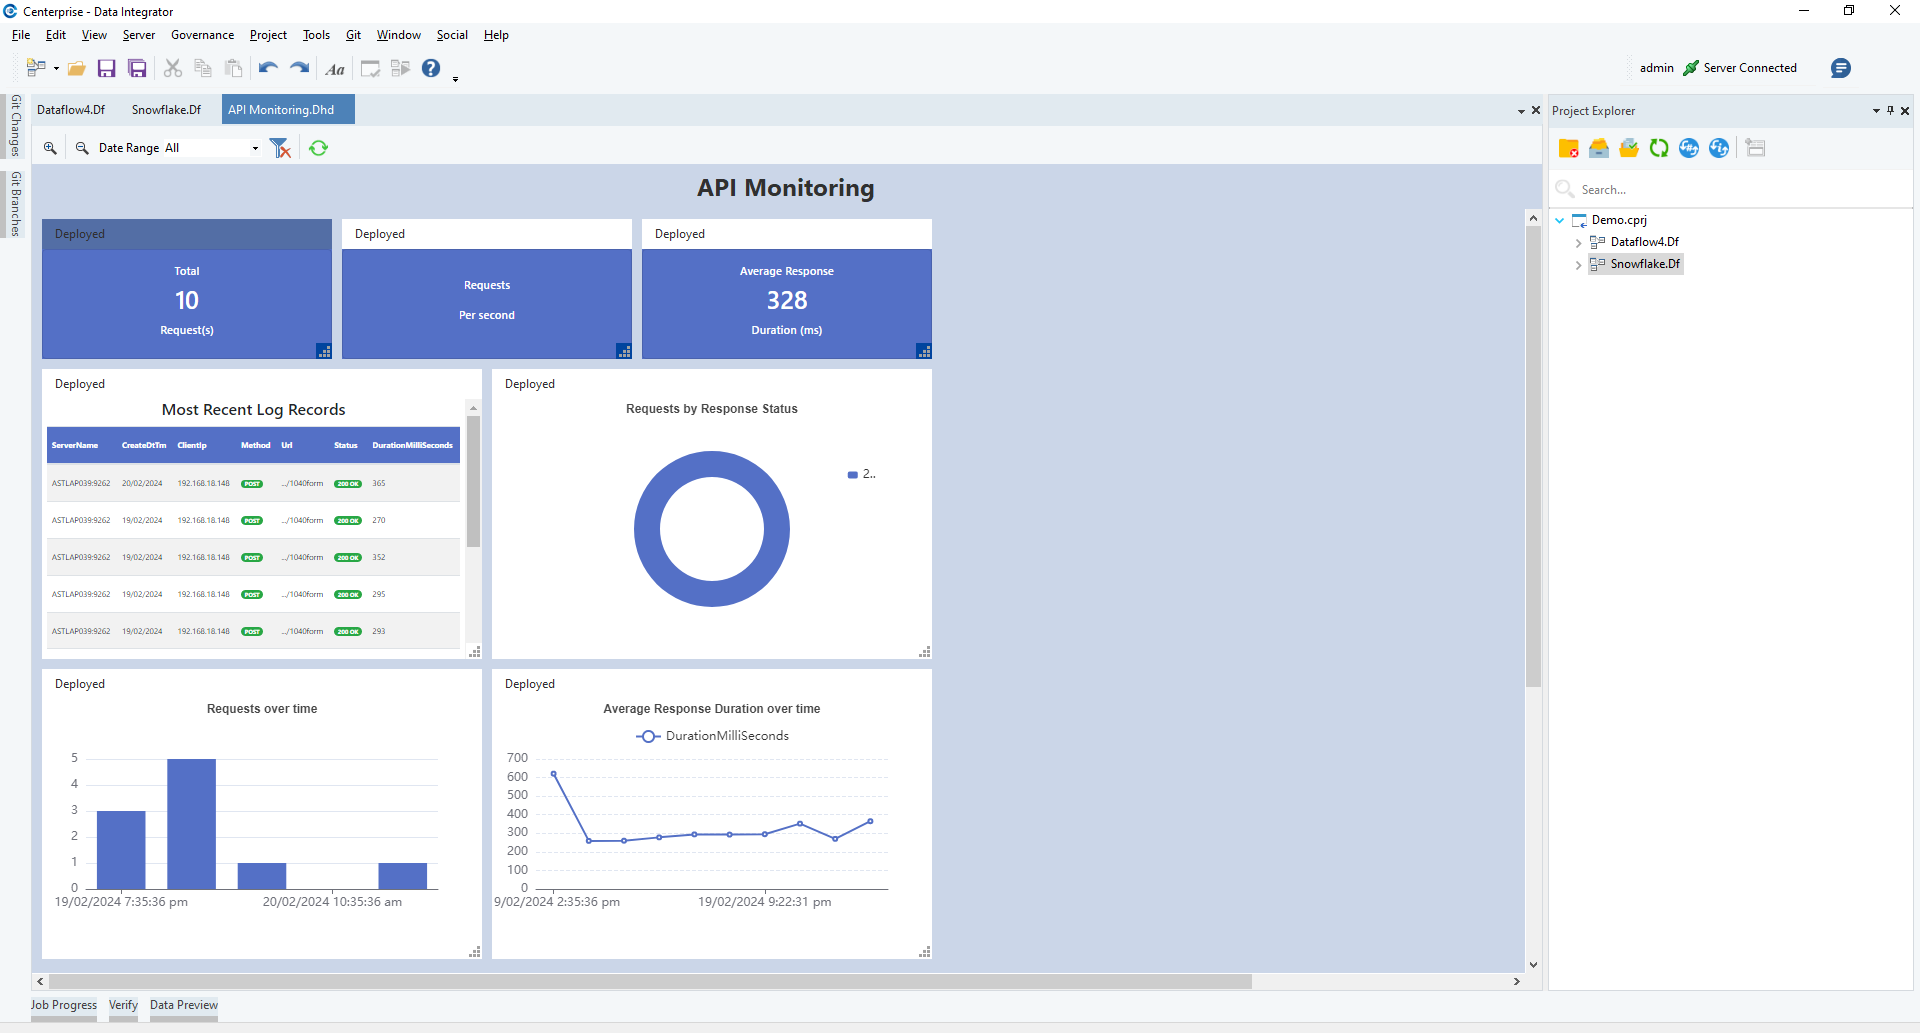
API monitoring dashboard
Start Building APIs Today!
An API-forward approach is a secure way to create collaborative applications, manage access, and collect data integral to decision-making processes. Astera’s no-code solution simplifies the creation and management of APIs, providing one application for the complete lifecycle of an API.
There is nothing easier than using an intuitive, drag-and-drop interface to create your APIs and share data with your internal and external stakeholders. The built-in functionalities are integral to a simple API-building experience, and the various monitoring capabilities allow you to analyze your data, bridging the gap between data and insights. Learn more about Astera API Management.
Schedule a free demo with Astera today and learn more about our code-free solutions, which empower business teams to make data-driven decisions faster.